I’d like to propose that January 2012 be considered “Grips Awareness Month”. Grips have been around since the earliest days of AutoCAD. In fact, Grips are one of the few tools that can be considered “old school” as well as “cutting edge” at the same time.
Let me explain…
Whenever you select an entity, (take the line below for example) you will see these small blue grips.
Grips are like little magnetic handles that can be used to edit a selected object. Typically they will appear at the location of object snaps. To make a change, simply click on a grip to make it “hot”, and then move the grip (thus stretching the entity) wherever you like.
Knowing this, grips can be used in lieu of object snaps. After selecting both the circle and the line below, I can click the endpoint of the line and “snap” it (remember the grips are magnetic) to the center of the circle.
Absolutely no commands are necessary, and everything is done via a few clicks of the mouse.
This default functionality has been around since the earliest days of AutoCAD.
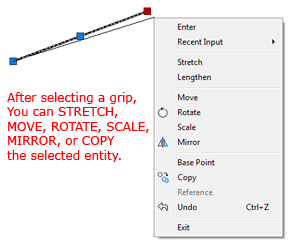
Grips can actually do much more. By default, selecting a grip puts you in “stretch mode”. If however, after selecting the grip you right-click, you’ll see you have many more options. Among other things, grips allow you to Stretch, Move, Rotate, Scale, Mirror, or Copy the selected entity.
(As a side note, if you’d rather not right-click to access these additional tools, simply tap your spacebar to cycle through the editing options.)
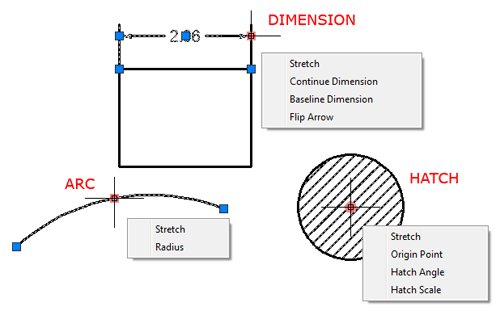
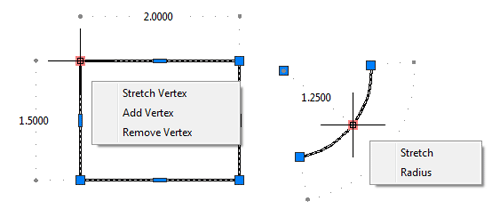
If you “hover” over a grip, AutoCAD will display editing options specific to the object you’ve selected. Below are a few examples…
Grips can also be used to query our drawings! If your Dynamic Input is turned on (press F12) grips become even more useful. Hover over a grip now and AutoCAD will tell you about the geometry of your object. If you select the grip at this point you can edit the dimensional values shown. (Press your Tab key to cycle between multiple dimensions.)
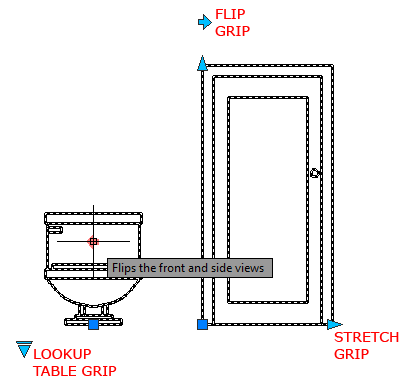
Grips are also used to drive dynamic blocks. Below I have inserted (and selected) two dynamic blocks. Notice the appearance of the grips. Their shape is used to signify what they do. In this case we have Stretch grips to adjust the width and height of the door, Flip grips used to switch between right and left handed, and a Lookup Table grip to select from several possible views of a block. In all cases, if you are unsure of what a grip does, simply hover over it and AutoCAD will tell you. I guess that means that grips have the ability to speak to us too.
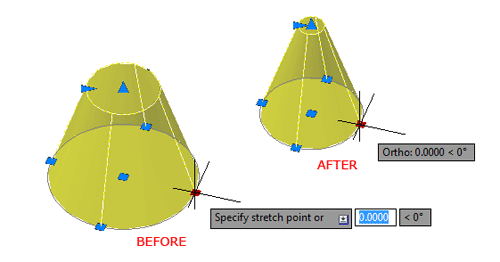
Grips aren’t limited to 2D either, they also work in 3D. In the example below, I’ve extruded a circle with a tapered angle. Afterward, I can use grips to edit the radius of the bottom circle.
(Note the radius of the top circle also changes because the tapered angle is held constant.)
Using grips, we can also edit faces, edges, or vertices of solids, surfaces or mesh objects.
Grips also extend beyond plain AutoCAD. Look for grips in all AutoCAD based vertical products. Try them in Civil 3D to edit your alignments, profiles, labels, pipe networks, etc. Try using them in Map 3D to edit your linked shape file geometry or annotations. With each new release of Autodesk software, more and more functionality is being added to these already powerful little tools. I think you’d be hard pressed to find another AutoCAD feature that can do the work of object snaps, modify geometry, display and edit object properties AND speak to the user. For a tool that is as old as AutoCAD itself, grips continue to be a relevant force even today.


Leave A Comment